Using Profiler to Trace Programs in M3

In some cases we might need to know what happens in the background when some function is performed in M3. For an example we will assume that we need to identify the tables that are getting updated when we create a record in CRS140 program.

There is an option in Life Cycle Manager that can be used to perform this task. In this post we will discuss how this option can be used.

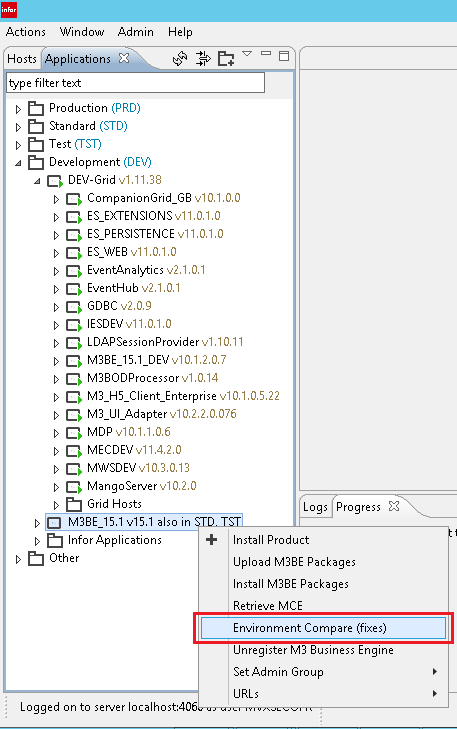
1. Log in to Life Cycle Manger, Right click on the BE node in desired environment and click on Manage Application.

01.png

2.  This will open up a tab that displays all the subsystems running in the business engine.

Setting up a dedicated Subsystem for our User Id

Note: All UI programs run in M3 Interactive subsystem where as MI programs (APIs) run in M3 API subsystem. M3 Auto subsystem handles Auto jobs. If we want to trace the functionality of CRS140 program we need to run the trace in M3 Interactive subsystem. However, at a given time many users will be using the system and M3 Interactive subsystem will have jobs from different users. If we run a trace in that subsystem, it will record data from all of those user interactions. Therefore I need to setup a dedicated subsystem for my user ID; so that it will only have jobs created by my user id.

3. Click on Tools.

02.png

4. Click on User Debug/ Trace

03.png

5. Click Add to add a user ID

04.png

6. Put the you user id in User Text box, set Trace as the Type and click Activate.

05.png

7. A user will be added to the Debug/ Trace Activation List.

06.png

8. Now log in to Smart Office with your user id and go to CRS140 program.

9. Go back to LCM and check the BE manage application screen. Now You should see a dedicated M3 Interactive subsystem created for your user id.

07.png

Enabling the Profiler

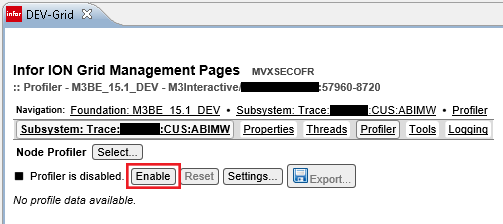
10. Now go in to newly spawned subsystem by clicking on type column of the relevant subsystem.

11. Click on Profiler.

08.png

12. Then click on Enable on the next screen.

09.png

13. Now go in to M3 and create a record in CRS140 program. Once the record has been created, go back to LCM and Disable the profiler. Then it will create a list of tasks that the BE has performed in the back end while you were creating a record in CRS140.

14. You can exporting this list of activities in to a CSV file for further analysis.

10.png

15. Once you have finished running the profiler, go back to User Debug/ Trace Activation screen and remove your user id from the list.

16. Then go to Manage Application Screen and Shutdown all dedicated subsystems that have been spawned for you user id.

11.png

12.png

You can use the same method to the trace the functionality of an API transaction as well. In that case you will have to enable the profiler in a M3 API subsystem instead of a M3 Interactive Subsystem.

Have a nice day…

Wrapping M3 APIs with Web Services

We discussed how to expose a SQL statement using M3 Web services in a previous post. This type of web service is really helpful if we are exposing M3 data to external applications.

But in most of the integrations, information flow both ways, requiring to update M3 with data coming from external applications. Infor has provided a number of APIs to update M3 from external applications. However using these APIs directly in intergations is not a good idea if the integration needs to be platform agnostic and integrated systems need to be loosely coupled.

Therefore it is better if we can use web services in these integrations. In this post we will discuss how to expose a M3 API as a Web service.

Let’s assume that we are integrating a supplier portal with M3 procurement module and we need to update Purchase order confirmation based on the details updated by the supplier in the portal. We can use PPS001MI – ConfirmLine API transaction to do this.

1. Create a new Web service in your local repository called SupplierPotalIntegration.

01

2. Select M3 API (MI Program) as the web service type and click Next.

02.png

3. Select a server to download the list of M3 APIs and on next dialog, provide your credentials.

03.png

4. Select M3 BE as the configuration in Select Configuration dialog screen.

04.png

5. Select PPS001MI – ConfirmLine from the API transactions list. Make sure that Create Field Alias check box is checked, so that in web service inputs and outputs will have descriptive names instead of M3 field names.

05.png

6. Give the Web Method a name and click Finish.

06.png

7. In Input section you can change field aliases, data types and field constraint (whether the field is mandatory or optional). However it is recommended to keep the data types and mandatory fields as it is, because changing them might cause errors.

8. Field aliases can be changed to give more meaningful names to web service inputs. For an example we can rename YourReference to ContactPerson.

07

9. In Output section, you  can select only required fields from standard API outputs and change aliases to give more meaningful names to web service outputs. This section is blank in our example because PPS001MI – ConfirmLine does not have any output fields.

08.png

10. Once inputs and outputs have been properly setup, save the web method, deploy it to the server and test it.

When you test the web service, you can notice that field aliases are shown as the web service inputs, not M3 field names. These descriptive names are really helpful to the developers if they are not familiar with M3 field names.

09.png

Have a nice day…

Compare Deployed fixes in Different Environments

In one of my previous posts we looked at how to install a fix to M3 BE using the Life Cycle Manager.

As a practice when I am deploying a fix, I will first deployed it in DEV environment and get the Key Users to test it to make sure that the fix works fine and there is no impact on existing functionalities. Then it is deployed in TST environment for business users to test it. Once users confirm the functionality of the fix, finally it is deployed in PRD.

Even though this process makes sure that a fix is properly tested before it is deployed in PRD, this can create discrepancies between environments. Therefore we might need to compare the fixes deployed in different environments in certain cases to make sure that fixes have been properly deployed in all environments.

1. Log in to LCM as an Administrator.

2. Expand any of the Grid Nodes and locate the M3BE_XX folder in the tree view. Right click on this folder and click Environment Compare (Fixes).

01

3. This opens up Environment Compare Tab in which you have to select your BE version. In my case it is 15.1.2.

02

4. Once the correct BE version selected, fixes that are available in your server will be displayed.

03

5. From the last few columns of the grid you can identify in which environments each fix has been deployed.

04.png

6. If it is hard for you to comparing fixes in this grid it self, you have the option of exporting these details to a spread sheet using Export to Excel option.

05.png

This is going to be really helpful option when you are troubleshooting issues in different environments.

Have a nice day…